Ekonos – Do it yourself
For those of you who don’t mind (or love) doing “crafts”, here are the instructions to produce it yourself. With a little manual work and very little money, you can make yourself a high quality Ekonos. The process is detailed below. Our advice: do it together, with family or friends, it’s more funny and you’ll make the game yours and faster!
Map printing
The map measures 420 x 594 mm (DIN-A2). The ideal way to print it is to take it to a copy shop and make a digital print by plotter.
Alternatively, if you have access to a printer that accepts the din-a3 format, the map can be printed on a total of 2 din-a3 sheets, which can then be assembled with paper glue and/or invisible adhesive tape.
If possible, use paper of some quality, for example 100g.
Because printers generally cannot print the entire surface of the sheets, i.e. they have a minimum margin that they leave blank, it is necessary to make some adjustments before printing:
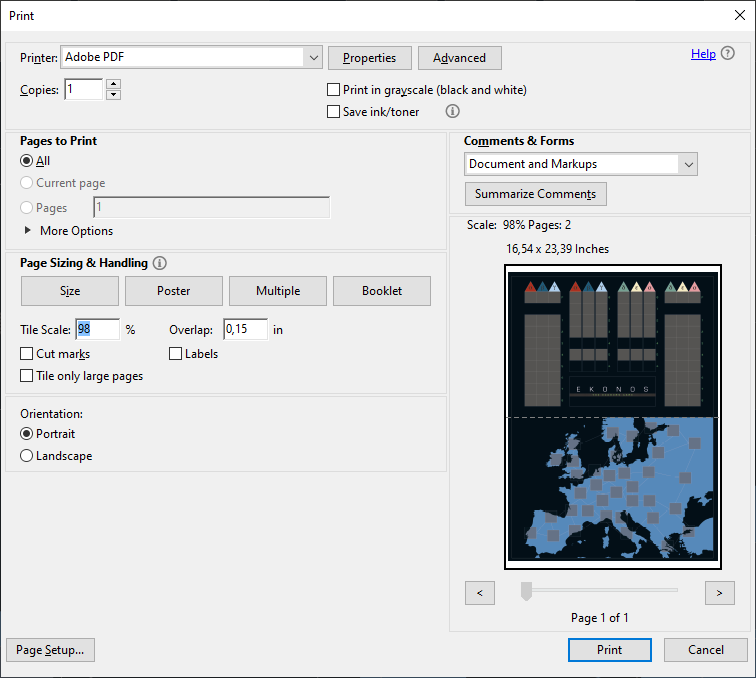
- From the Acrobat Reader print dialog box, in the lower left corner, click on the Page Setup button, and in the Page Setup window select A3 size.
- Then return to the main window of the print dialog box, click on the Poster button, and under it reduce the scale a little (98%) and introduce 0,15in overlap. In the preview on the right side you will see how the map is split into 2 pieces din-a3.
- If you don’t dispose of any of the previous systems, you can do the previous procedure but with normal size sheets din-a4, in this case the main map will have 4 pieces.
Counters
The counters have all faces and backs, in total there are 4 din-a4 sheets that once assembled will form 2 sheets of counters on both sides.
We recommend you to stick them on both sides on cardboard sheets of 1mm thickness or a little less. Commercial board game pieces are usually about 2mm thick, if you do it in that thickness they will look better but it will be more difficult to cut them out.
The tiles are totally centered inside the pages, so they can be glued whole, although sometimes the printer will offset them, in that case before gluing them you can cut them out using the frame they have drawn around them.
It is very important that they are well aligned, otherwise when you cut them one of the sides of the cards would look bad.
You can use contact glue, paper spray glue, or white matte self-adhesive A4 sheets to stick them to the cardboard. We don’t recommend sticking then with glue stick because it’s too weak and the counters will come off. We don’t recommend using white glue because water can make the paper where the cards are printed wrinkle or crackle.
In any case, you have to be very careful when applying the glue, if it is applied in excess it could damage or dirty the paper where the counters are printed, and if it does not cover the whole surface, then when you cut the counters some of them could come off.
Finally, to cut them out you can use a cutter or scissors (we use scissors, it’s faster).
Cards
We recommend you print them on slightly thick paper (100grs or 120grs) and after cutting them out, insert them into 2 5/8″ x 3 5/8″ plastic sleeves. These sleeves can be purchased in specialized stores in packs of 100, we use the Ultra-pro brand, but there are other brands and many models and qualities. In total the game has 36 euro-poker size cards (63x88mm), so one pack will be enough.
You can print them on double-sided din-a4 sheets, or you can also print the side and back on separate sheets, and after cutting them out put one side and one back in each plastic sleeve.
Box
The cover and bottom of the box are 427x348mm, they don’t fit in a DIN-A3 sheet, and if you print them in parts like the map, the box will look bad, you will have to make them in a copy shop. The measures to make the cardboard box can be obtained from the PDF.
In This youtube channel you have information about the tools and techniques to make your own board game.